1 - Foundation
VS Code with Remote-SSH
I used VS Code to SSH into my Ubuntu VM, since with VS Code I can easily create directories, files, and it makes it easier to write YAML code.
Installating the Remote-SSH Extension
I opened VSCode and went to the Extensions panel (Ctrl+Shift+X). I searched for ‘Remote - SSH’ by Microsoft and clicked ‘Install’.

- Remote - SSH : connects to any SSH host
- Remote - SSH: Editing Configuration Files : gives me a UI to manage SSH config
- Remote - Explorer : sidebar panel to manage my remote connections
Connecting to Ubuntu VM
Right now I’m just setting everything up, so I will create an SSH-key with no passphrase.
SSH Keys
How SSH Key Authentication Works
When I generate an SSH key pair, I get 2 files:
- Private key - stays on my machine, never shared, treated like a password
- Public key - placed on every server I want to connect to
When I SSH in, the server uses the public key to issue a challenge that only the private key can solve. No password ever crosses the network.
On my Windows PC, I ran the following ssh-keygen command on PowerShell:
ssh-keygen -t ed25519 -C "ansible-key" -f "c\users\nesto\.ssh\ansible_key"- -t ed25519:
- specifies the key type. Ed25519 is the modern standard (faster and more secure than the older RSA 2048 keys)
- -C “ansible-key”:
- a comment/label embedded in the public key to identify it later.
- -f:
- specifies the output filename.
When prompted for a passphrase, I pressed ‘Enter’ to skip it.
Copying the Public Key to Ubuntu
Now I need to put the public key on my VM. One way is to issue this PowerShell command:
type c:\users\nesto\.ssh\ansible_key.pub | ssh [email protected] "mkdir -p ~/.ssh && cat >> ~/.ssh/authorized_keys && chmod 600 ~/.ssh/authorized_keys && chmod 700 ~/.ssh"Code Explanation
type- reads my public key file on Windows- Pipes it over SSH into the Ubuntu VM
- Creates
~/.ssh/if it doesn’t exist - Appends my public key to
~/.ssh/authorized_keys - Sets correct permissions on both the file and directory
authorized_keys is the file Ubuntu checks when I SSH in. It can hold multiple public keys (1 per line). This is how I’d add keys for multiple engineers or multiple machines to the same server.Then to test if it worked, I issued the following command from VS Code:
ssh -i ~/.ssh/ansible_key [email protected]Disabling Password Authentication
Once key-based auth is confirmed working, I disable password SSH login on Ubuntu entirely.
sudo nano /etc/ssh/sshd_configI find and change these lines in sshd_config:
PasswordAuthentication no
PubkeyAuthentication yes
PermitRootLogin no
Then I restart SSH:
sudo systemctl restart sshConnecting via SSH-Remote
Now, back in VS Code, I pressed Ctrl+Shift+P to open the Command Palette and typed: Remote-SSH: Connect to Host
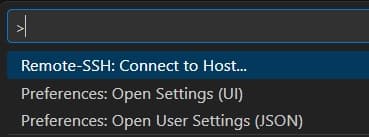
It then asked for a host: [email protected]
VS Code opened a new window, downloaded the VS Code Server onto the Ubuntu VM and connected. I now have a fully functional VS Code environment running on Ubuntu. I can open a terminal in VS Code and it drops me directly into a bash shell on the VM.
VS Code Extensions
Next, I installed some extensions on the remote host.

- YAML (by Red Hat) - Almost everything in Ansible is YAML. This extension gives me syntax highlighting, schema validation, and auto-formatting for
.yamlfiles. After installing it automatically validates Ansible playbooks against the Ansible YAML schema.

- Ansible (by Red Hat) - This is purpose-built for Ansible work. It provides auto-completion for Ansible module names and parameters, definition for roles and variables, integration with
ansible-lint, and syntax highlighting for Jinja2 expressions inside YAML files.

- Python (by Microsoft) - Since Ansible is Python-based and I’ll be writing Python scripts alongside my playbooks, this is essential. It give sme IntelliSense, debugging, and virtual environment detection.

- GitLens (by GitKaraken) - GitLens supercharges VS Code’s built-in Git support. Inline blame annotations that show me who last changed a line and when, directly in the editor. For a team environment, this is invaluable when tracking down who made a change to a playbook.

- indent-rainbow - Ansible YAML is white-space sensitive. A misplaced indent breaks everything. This extension color codes indentation levels, making it immediately obvious when something is off.

- Better Comments - Lets me color code comments in my playbooks.
Home Directory Structure
When I log into my VM, I land in my home directory /home/nesto. This is my personal space on the system. Understanding how to organize it sets me up for clean Ansible project management.
What Lives Where
| |
- Line 1:
- My home directory (~)
- Line 2:
- SSH keys and known_hosts (always chmod 700)
- Line 3:
- Public keys allowed to log in as me
- Line 4:
- Fingerprints of hosts I’ve SSH’d to
- Line 5:
- Shell config, runs on every new terminal
- Line 6:
- Runs at login (not every terminal)
- Line 7:
- Where I keep all my Ansible projects
- Line 8:
- My main project repo
- Line 9:
- Python virtual environments
Key Directories
| |
- Line 1:
- System-wide configuration files
- Line 2:
- Default location for ansible.cfg
- Line 3:
- System executables
- Line 4:
- System logs
- Line 5:
- Temporary files, cleared on reboot
~/projects/. That way, when I come back to a project after weeks or months, I know exactly where to find everything. This also makes Git management cleaner, each project is its own directory and its own repo.Persistent Terminal Sessions
tmux is a terminal multiplexer. It runs a terminal sessions on the Ubuntu VM that persists even when I disconnect. When I reconnect, I just re-attach to the session and everything is exactly as I left it.
tmux Concepts
- Session - a peristent workspace. It survives disconnects
- Window - like a tab inside a session. I can have multiple windows.
- Pane - a split within a window. I can have a playbook running in 1 pane and watch logs in another.
tmux Commands
| |
- Line 1:
- reate a new session named “ansible-lab”
- Line 2:
- Re-attach to an existing session
- Line 3:
- List all active sessions
Inside tmux all commands start with the prefix Ctrl+B:
Ctrl+B, d: Detach from session (session keeps running)Ctrl+B, c: Create a new windowCtrl+B, n: Next windowCtrl+B, p: Previous windowCtrl+B, ": Split pane horizontallyCtrl+B, %: Split pane verticallyCtrl+B, arrow keys: Move between panesCtrl+B, z: Zoom a pane to full screen (zoom again to restore)Ctrl+B, [: Enter scroll mode (use arrow keys, q to exit)
Ctrl+B, []) is 1 of the most useful tmux features for Ansible. When a playbook produces hundreds of lines of output, I can scroll back through all of it without losing my prompt.tmux Workflow
Every time I start a lab sessions I do this:
Check if my session already exists
tmux lsIf it does, attach to it
tmux attach -t ansible-labIf it doesn’t, create it
tmux new -s ansible-labInside the session I create 2 windows:
Window 1- Running playbooksWindow 2- Editing files, checking logs
tmux kill-session -t ansible-lab). Over time, if I forget about old sessions, they pile up. I make a habit of checking tmux ls and cleaning up finished sessions.With Part 1 complete, my workspace is ready. I have a stable, secure SSH connection from VS Code into my Ubuntu VM, a clean directory structure, an updated system, and tmux keeping my sessions alive. Everything from here on is built on this foundation.