5 - Ansible Install
This is me documenting my journey of learning Ansible that is focused on network engineering. It’s not a “how-to guide” per-say, more of a diary. Each part will build upon the last. A lot of information on here is so I can come back to and reference later. I also learn best when teaching someone, and this is kind of me teaching.
Installing Ansible
This part isn’t about reinstalling it, it’s about understanding what I actually installed, why it’s structured the way it is, and what’s happening behind the scenes when a playbook runs. That understanding is what separates someone who can copy-paste playbooks from someone who can write, debug, and maintain them confidently.
Installation and Verification
Ansible was installed in Part 3 inside the ansible-network virtual environment. Before going any further, I confirm everything is in place and pointing to the right locations.
Activate the Environment and Verify
Activate the virtualenv
source ~/venvs/ansible-network/bin/activateConfirm the prompt changed
# (ansible-network) ansible@ubuntu:~$Verify Ansible is installed and check the version
ansible --versionExpected output:
ansible [core 2.17.x]
  config file = None
  configured module search path = ['/home/ansible/.ansible/plugins/modules', ...]
  ansible python module location = /home/ansible/venvs/ansible-network/lib/python3.10/site-packages/ansible
  ansible collection location = /home/ansible/.ansible/collections:/usr/share/ansible/collections
  executable location = /home/ansible/venvs/ansible-network/bin/ansible
  python version = 3.10.12 (main, ...) [GCC 11.4.0]
  jinja version = 3.1.x
  libyaml = True
The three lines I always check:
ansible python module location- must point into my virtualenv (venvs/ansible-network/...), not/usr/lib/...executable location- must point into my virtualenv (venvs/ansible-network/bin/ansible), not/usr/bin/ansiblelibyaml = True- confirms the fast C-based YAML parser is available. If this showsFalse, YAML parsing will be significantly slower. Fix:sudo apt install -y python3-yaml
Verify All Supporting Tools
ansible-lint:
ansible-lint --version
# ansible-lint 24.x.x using ansible-core:2.17.x ...
yamllint:
yamllint --version
# yamllint 1.35.x
ansible-navigator:
ansible-navigator --version
# ansible-navigator 24.x.x
Check installed collections
ansible-galaxy collection listansible vs ansible-core vs Collections
When I ran pip install ansible in Part 3, I didn’t just install one thing. I need to understand what I actually have, because the distinction matters when reading documentation, troubleshooting errors, and managing upgrades.
The Three Layers
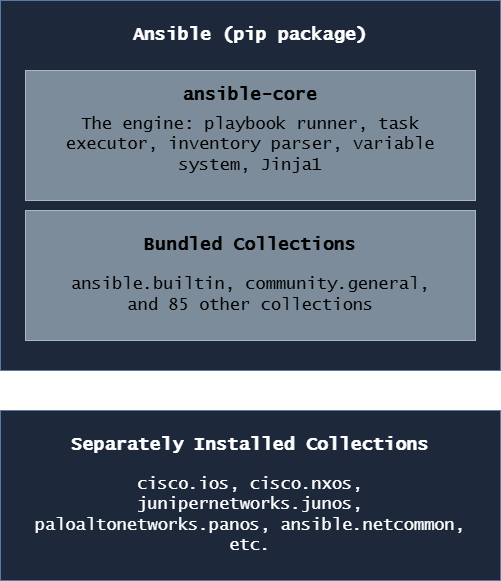
ansible-core
This is the engine, the actual Ansible runtime. It includes:
- The
ansible-playbookcommand - The
ansiblead-hoc command - The
ansible-inventorycommand - The
ansible-vaultcommand - The
ansible-galaxycommand - The built-in modules under the
ansible.builtinnamespace (copy,template,file,debug,assert, etc.) - The variable system, Jinja2 integration, and connection plugins
ansible-core alone is a minimal install. It can run playbooks but has very few modules beyond the basics.
ansible (the full package)
pip install ansible installs ansible-core plus a curated set of ~85 community collections. This is what most people mean when they say “install Ansible.”
To see what version of ansible-core is inside my ansible install:
python3 -c "import ansible; print(ansible.__version__)"

# ansible and ansible-core version numbers differ
# ansible 9.x.x contains ansible-core 2.16.x
# ansible 10.x.x contains ansible-core 2.17.x
Collections
Collections are the packaging format for Ansible content like modules, roles, plugins, and documentation bundled together by namespace and name (cisco.ios, ansible.netcommon, etc.).
There are two types:
- Bundled collections - come with
pip install ansible, no separate install needed - External collections - installed separately with
ansible-galaxy collection install
The network vendor collections (cisco.ios, cisco.nxos, etc.) are external, they’re maintained by the vendors themselves and updated independently of Ansible’s release cycle.
When to Use ansible-core Instead of ansible
In enterprise environments with strict package management, some teams prefer:
pip install ansible-core
ansible-galaxy collection install cisco.ios cisco.nxos junipernetworks.junos paloaltonetworks.panos ansible.netcommon ansible.utils
This gives complete control over exactly which collection versions are installed and avoids pulling in collections that aren’t needed. The tradeoff is more explicit management. For this guide, the full ansible package is fine.
The Ansible Architecture
Understanding this diagram saves hours of debugging. When something goes wrong, knowing which component is responsible tells me where to look.
The Big Picture
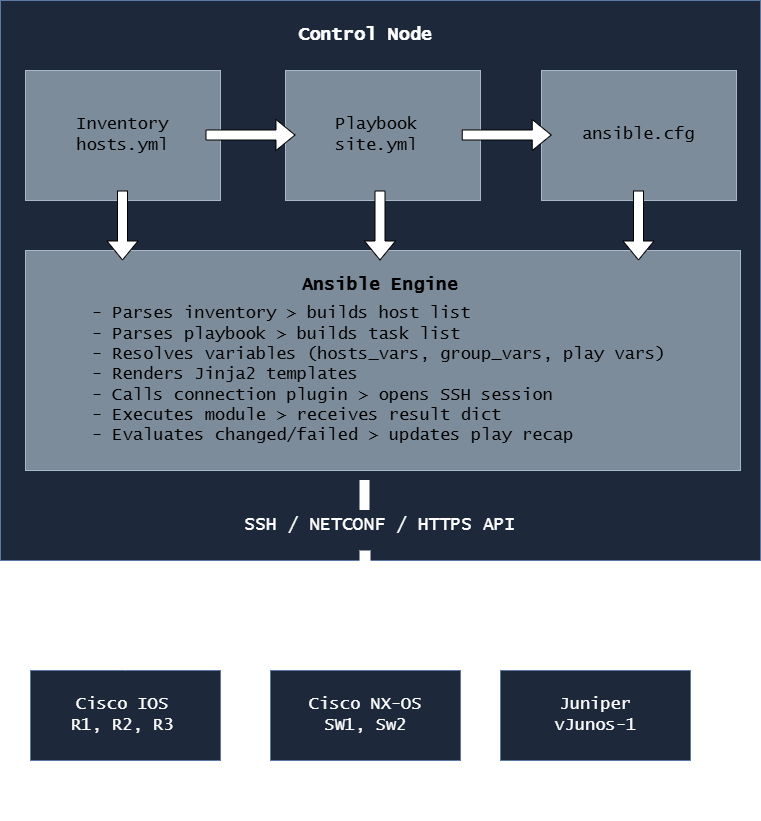
The Key Components
Control Node:
The Ubuntu VM where Ansible is installed and where I run ansible-playbook. All the intelligence lives here, the devices themselves run nothing special.
Inventory:
The file (or files) that tell Ansible what devices exist, how to reach them, and how to group them. This is where ansible_host, ansible_user, ansible_network_os, and similar connection variables are defined. Without an inventory, Ansible has nothing to connect to.
Playbook: A YAML file that describes what I want to happen: which hosts to target, in what order, using which modules, with which parameters. The playbook is the “what” and the inventory is the “where.”
ansible.cfg:
The configuration file that controls Ansible’s behavior: where to find the inventory, which connection timeout to use, whether to check SSH host keys, and dozens of other settings. Ansible searches for this file in the current directory first, then ~/.ansible.cfg, then /etc/ansible/ansible.cfg.
Modules:
The individual units of work e.g. ios_config, ios_facts, nxos_vlans, debug, template, etc. Each module is a Python script that performs one specific task and returns a result dictionary with at minimum the keys changed and failed.
Plugins: Extend Ansible’s core functionality. The most relevant for network work:
- Connection plugins - define how Ansible connects to devices (
network_cli,netconf,httpapi) - Callback plugins - control how output is formatted and displayed
- Filter plugins - extend Jinja2 with extra functions (
ipaddr,selectattr,combine) - Lookup plugins - pull data from external sources into variables
Tip
The single most important thing to understand about this architecture is that the control node does all the work. My Ubuntu VM is where Python runs, where SSH sessions are opened, where Jinja2 templates are rendered, and where results are processed. The network devices just receive CLI commands over SSH and send back text output. This is fundamentally different from how Ansible manages Linux servers (where it uploads and runs Python on the remote machine). Understanding this distinction explains why network playbooks use connection: network_cli and gather_facts: false (there’s no Python on a Cisco router to run facts gathering).
How Ansible Connects to Network Devices
Network CLI Connection Plugin
For Cisco IOS, NX-OS, Juniper, and Palo Alto CLI automation, I use connection: network_cli. This is the standard for SSH-based network device automation.
- name: Configure IOS devices
  hosts: cisco_ios
  gather_facts: false
  connection: network_cli

  tasks:
    - name: Show version
      cisco.ios.ios_command:
        commands: show version
When Ansible sees connection: network_cli, here’s what happens:
- Ansible loads the
network_cliconnection plugin - The connection plugin uses Paramiko (by default) to open an SSH connection to the device
- The plugin handles the device’s CLI prompts like login banners,
#prompts,--More--pagination, config mode prompts - The plugin sends CLI commands and reads back the output
- The module parses that output and builds the result dictionary
- The SSH session is kept alive for all tasks in the play (not reopened per task)
Paramiko
Paramiko is a pure-Python SSH implementation. It’s the default SSH library for network device connections in Ansible because:
- It handles vendor-specific SSH quirks (different banners, prompts, timing)
- It’s controllable from Python code. Modules can set per-command timeouts, handle
--More--prompts, etc. - It works even when OpenSSH’s strict key exchange requirements conflict with older network device SSH implementations
Confirm paramiko is installed in the virtualenv
python3 -c "import paramiko; print(f'Paramiko version: {paramiko.__version__}')"Paramiko vs OpenSSH
| Feature | Paramiko | OpenSSH |
|---|---|---|
| Where it runs | Pure Python, inside Ansible | System binary (/usr/bin/ssh) |
| Default for network devices | Yes | No |
| Handles old device SSH ciphers | Better | Requires manual cipher config |
| Performance (many hosts) | Slightly slower | Faster |
| ControlMaster (multiplexing) | No | Yes |
| Debugging | Python exceptions | -vvv SSH debug output |
To switch a specific host or group from Paramiko to OpenSSH:
ansible_connection: network_cli
ansible_network_cli_ssh_type: openssh
I only do this if I have a specific reason since Paramiko is the right default for network devices.
"No matching key exchange method found" with OpenSSH, the fix is either to switch back to Paramiko, update the device’s SSH configuration, or add legacy cipher support to ~/.ssh/config. Paramiko handles this silently in most cases, which is why it’s the network automation default.ansible_network_os
This variable is mandatory for network_cli connections. It tells Ansible which terminal handler to use like how to detect the prompt, how to enter config mode, how to handle pagination.
# group_vars/cisco_ios.yml
ansible_network_os: cisco.ios.ios

# group_vars/cisco_nxos.yml
ansible_network_os: cisco.nxos.nxos

# group_vars/juniper.yml
ansible_network_os: junipernetworks.junos.junos

# group_vars/paloalto.yml
ansible_network_os: paloaltonetworks.panos.panos
The format is <collection_namespace>.<collection_name>.<platform>.
If I forget to set ansible_network_os, Ansible throws a confusing error:
"msg": "Unable to automatically determine host network os. Please manually configure ansible_network_os value for this host"The fix is always the same: set ansible_network_os in group_vars for that device group. This is one of the most common errors when first setting up network automation.
NETCONF
NETCONF is an XML-based network management protocol supported on modern IOS-XE and Juniper devices. It’s more structured than CLI parsing and is the future direction for network automation but it requires the device to have NETCONF enabled.
On IOS-XE, enable NETCONF
# netconf-yangPlaybook using NETCONF connection:
- name: Configure IOS-XE via NETCONF
  hosts: iosxe_devices
  gather_facts: false
  connection: netconf

  tasks:
    - name: Get device facts via NETCONF
      ansible.netcommon.netconf_get:
        filter: <interfaces xmlns="..."/>
For this lab, I focus on network_cli since it works with all four platforms (IOS, NX-OS, Juniper, Palo Alto) without requiring any device-side configuration changes. NETCONF becomes relevant in advanced IOS-XE and Juniper automation and is covered where appropriate in later parts.
Tip
A quick way to test whether a device will accept an Ansible connection before running any playbook: use an ad-hoc command:
ansible R1 -m ansible.netcommon.net_ping -i inventory/hosts.ymlIf this returns pong, Ansible can reach and authenticate to the device. If it fails, I have a connectivity or credential issue to fix before anything else.
Agentless Automation
Traditional monitoring and management tools require an agent; a piece of software running on the managed device that communicates with a central server. Network devices can’t run agents. They run proprietary operating systems with no mechanism to install third-party software.
Ansible is agentless by design. Here’s what that means in practice:
Traditional Agent-Based Tool:
Control Server ←──── Agent (running on device) ←── Device

Ansible (Agentless):
Control Node ──SSH──▶ Device CLI ──▶ Returns output ──▶ Control Node processes it
Ansible’s only requirement on managed network devices:
- SSH enabled (
ip ssh version 2) - A user account with appropriate privilege level
No Python. No agent. No daemon. No TCP port other than 22 (or whatever SSH port is configured). This is why Ansible works on Cisco IOS devices from 2005 just as well as IOS-XE devices from 2024 because if it has SSH, Ansible can automate it.
The Implication for gather_facts
In server automation, Ansible’s first task is always to gather facts. It runs a Python script on the remote host to collect OS version, IP addresses, disk space, etc. On network devices, there’s no Python to run, so I disable this:
- name: Configure routers
  hosts: cisco_ios
  gather_facts: false
gather_facts: false- Always false for network devices.
ansible.cfg Configuration File
ansible.cfg controls Ansible’s behavior project-wide. Having a good ansible.cfg means I don’t have to pass dozens of flags on every command.
Where Ansible Looks for ansible.cfg
Ansible checks these locations in order, using the first one it finds:
1. $ANSIBLE_CONFIG environment variable (if set)
2. ./ansible.cfg (current working directory) ← I always use this
3. ~/.ansible.cfg (home directory)
4. /etc/ansible/ansible.cfg (system-wide)
I always put ansible.cfg in the project root e.g. ~/projects/ansible-network/ansible.cfg. This means the config is project-specific, version-controlled with Git, and automatically used whenever I cd into the project directory.
Creating the Project ansible.cfg
nano ~/projects/ansible-network/ansible.cfg[defaults]
# Inventory file location
inventory = inventory/hosts.yml
# Default remote user for SSH connections
remote_user = ansible
# Disable host key checking for lab environments
# CHANGE TO True IN PRODUCTION
host_key_checking = False
# SSH connection timeout in seconds
timeout = 30
# Number of parallel connections (forks)
forks = 10
# Where to look for roles
roles_path = roles/
# Where to look for collections
collections_path = collections/
# Retry files — where to write them (or disable entirely)
retry_files_enabled = False
# Stdout callback — prettier output
stdout_callback = yaml
# Don't show warnings about deprecations (set to True when debugging)
deprecation_warnings = False
# Default interpreter for Python (uses the virtualenv's Python)
interpreter_python = auto_silent
[inventory]
# Enable inventory plugins
enable_plugins = yaml, ini, auto
[ssh_connection]
# Use Paramiko as the default SSH transport for network devices
# (This is the default for network_cli but explicit is better)
ssh_args = -o ControlMaster=no -o ControlPersist=no
# Pipelining speeds up Linux host connections (leave False for network devices)
pipelining = False
[persistent_connection]
# How long to keep a persistent SSH connection alive between tasks (seconds)
connect_timeout = 30
# How long to wait for a command to complete (seconds)
command_timeout = 30host_key_checking = False- disables SSH host key verification. Fine for a lab where I’m spinning up and tearing down Containerlab topologies constantly (new devices get new keys). Must beTruein production.forks = 10- run tasks against 10 devices simultaneously. The default is 5. Increase for larger inventories.stdout_callback = yaml- formats task output as clean YAML instead of the default ugly single-line format. Much easier to read.retry_files_enabled = False- disables.retryfiles (which are in.gitignoreanyway). I find them more annoying than useful.interpreter_python = auto_silent- silences the Python interpreter warning that Ansible sometimes shows.connect_timeoutandcommand_timeoutin[persistent_connection]- critical for network devices. If a device is slow to respond (common on older hardware or WAN links), the default timeouts cause false failures.
Warning
host_key_checking = False is acceptable for a lab but is a meaningful security risk in production. Without host key checking, Ansible will connect to any device claiming to be the target IP including a man-in-the-middle attacker. In production environments, I maintain a known_hosts file with pre-populated device fingerprints, or use an inventory plugin that manages host keys. Never leave host_key_checking = False in a production ansible.cfg.
Checking the Active Configuration
Dump the entire Ansible configuration, showing which file each setting comes from
ansible-config dumpShow only settings that differ from the defaults
ansible-config dump --only-changedShow the value of a specific setting
ansible-config dump | grep HOST_KEY_CHECKINGansible-config dump is my first stop when Ansible behaves unexpectedly since it shows exactly what configuration is in effect and where each setting came from.
Tip
ansible-config dump --only-changed is especially useful when inheriting an existing Ansible environment. It shows exactly which defaults have been overridden and where.
Ansible Galaxy and Collections
Ansible Galaxy (galaxy.ansible.com) is the public hub for Ansible collections and roles. It’s where vendor-maintained collections like cisco.ios live, and where I install them from.
ansible-galaxy
Install a single collection
ansible-galaxy collection install cisco.iosInstall a specific version
ansible-galaxy collection install cisco.ios:==8.0.0Install a minimum version
ansible-galaxy collection install cisco.ios:>=8.0.0Upgrade an existing collection to the latest version
ansible-galaxy collection install cisco.ios --upgradeInstall from the collections/requirements.yml file
ansible-galaxy collection install -r collections/requirements.ymlList all installed collections and their versions
ansible-galaxy collection listWhere Collections Are Installed
By default, collections install to ~/.ansible/collections/ansible_collections/:
~/.ansible/collections/
└── ansible_collections/
    ├── cisco/
    │   ├── ios/
    │   │   ├── plugins/modules/     #ios_config.py, ios_facts.py, etc.
    │   │   ├── roles/
    │   │   └── README.md
    │   └── nxos/
    ├── junipernetworks/
    │   └── junos/
    ├── paloaltonetworks/
    │   └── panos/
    └── ansible/
        ├── netcommon/
        └── utils/
I can also install collections inside the project directory (useful for CI/CD):
ansible-galaxy collection install cisco.ios -p ./collections/This installs into ./collections/ansible_collections/ relative to the project. Combined with collections_path = collections/ in ansible.cfg, Ansible finds them automatically.
The Six Collections I Use Throughout This Project
cisco.ios
The official Cisco collection for IOS and IOS-XE devices. Contains modules for every aspect of IOS configuration.
ansible-galaxy collection install cisco.iosKey modules I’ll use constantly:
cisco.ios.ios_facts          # Gather device facts (version, interfaces, routing)
cisco.ios.ios_command        # Run show commands and capture output
cisco.ios.ios_config         # Push configuration lines (the workhorse module)
cisco.ios.ios_vlans          # Manage VLANs declaratively
cisco.ios.ios_interfaces     # Manage interface settings
cisco.ios.ios_l2_interfaces  # Manage Layer 2 interface settings (switchport)
cisco.ios.ios_l3_interfaces  # Manage Layer 3 interface settings (IP addressing)
cisco.ios.ios_bgp_global     # Manage BGP global configuration
cisco.ios.ios_ospfv2         # Manage OSPFv2 configuration
cisco.ios.ios_acls           # Manage access control lists
cisco.ios.ios_static_routes  # Manage static routes
cisco.ios.ios_users          # Manage local user accounts
cisco.ios.ios_banner         # Manage login and MOTD banners
cisco.nxos
The official Cisco collection for Nexus NX-OS devices.
ansible-galaxy collection install cisco.nxosKey modules:
cisco.nxos.nxos_facts        # Gather NX-OS device facts
cisco.nxos.nxos_command      # Run NX-OS show commands
cisco.nxos.nxos_config       # Push NX-OS configuration
cisco.nxos.nxos_vlans        # Manage VLANs on NX-OS
cisco.nxos.nxos_interfaces   # Manage NX-OS interfaces
cisco.nxos.nxos_bgp_global   # Manage NX-OS BGP
cisco.nxos.nxos_feature      # Enable/disable NX-OS features (bgp, ospf, vpc, etc.)
cisco.nxos.nxos_vrf          # Manage VRFs on NX-OS
cisco.nxos.nxos_vpc          # Manage Virtual Port Channel
junipernetworks.junos
The official Juniper Networks collection for Junos OS.
ansible-galaxy collection install junipernetworks.junosKey modules:
junipernetworks.junos.junos_facts      # Gather Junos facts
junipernetworks.junos.junos_command    # Run Junos operational commands
junipernetworks.junos.junos_config     # Push Junos configuration (set or XML format)
junipernetworks.junos.junos_interfaces # Manage Junos interfaces
junipernetworks.junos.junos_vlans      # Manage Junos VLANs
Info
Junos has a fundamentally different configuration model than Cisco. Junos uses a candidate configuration which means changes are staged but not active until a commit is issued. Ansible’s junos_config module handles this automatically: it stages changes, then commits. If the commit fails, it automatically rolls back. This is more reliable than Cisco’s IOS model where ios_config applies changes line by line with no built-in rollback.
paloaltonetworks.panos
The official Palo Alto Networks collection for PAN-OS firewalls.
ansible-galaxy collection install paloaltonetworks.panosKey modules:
paloaltonetworks.panos.panos_facts          # Gather PAN-OS facts
paloaltonetworks.panos.panos_address_object # Manage address objects
paloaltonetworks.panos.panos_security_rule  # Manage security policies
paloaltonetworks.panos.panos_nat_rule       # Manage NAT rules
paloaltonetworks.panos.panos_interface      # Manage interfaces
paloaltonetworks.panos.panos_zone           # Manage security zones
paloaltonetworks.panos.panos_commit         # Commit configuration changes
Info
PAN-OS automation works differently from CLI-based devices. Palo Alto firewalls expose an XML API, and the panos collection communicates via that API rather than SSH CLI. This means the connection type for PAN-OS playbooks is httpapi, not network_cli. Additionally, PAN-OS requires an explicit panos_commit task at the end which changes staged via API are not active until committed.
ansible.netcommon
This collection provides shared networking modules and plugins used across all vendor collections.
ansible-galaxy collection install ansible.netcommonKey modules and plugins:
ansible.netcommon.net_ping        # Vendor-neutral ping test
ansible.netcommon.netconf_get     # NETCONF get operations
ansible.netcommon.netconf_config  # NETCONF config operations
ansible.netcommon.cli_command     # Send raw CLI commands (vendor-neutral)
ansible.netcommon.cli_config      # Send raw CLI config (vendor-neutral)
Connection plugins (used automatically, not called directly)
network_cli   # SSH-based CLI connection for all vendors
netconf       # NETCONF protocol connection
httpapi       # HTTP/HTTPS API connection (used by PAN-OS, some IOS-XE)
ansible.utils
This collection provides utility modules and Jinja2 filters that are helpful for network automation (particularly for working with IP addresses and validating data).
ansible-galaxy collection install ansible.utilsKey features:
# Modules
ansible.utils.validate           # Validate data against a schema
ansible.utils.fact_diff          # Compare two sets of facts
Jinja2 filters (used inside {{ }} expressions in playbooks and templates)
ansible.utils.ipaddr             # IP address manipulation
ansible.utils.ipsubnet           # Subnet calculations
ansible.utils.ipv4               # Filter for IPv4 addresses only
ansible.utils.ipv6               # Filter for IPv6 addresses only
ansible.utils.network_in_usable  # Check if IP is usable in a subnet
Example of ansible.utils filters in a playbook:
vars:
  mgmt_network: "192.168.1.0/24"

tasks:
  - name: Show network information
    ansible.builtin.debug:
      msg:
        - "Network:   {{ mgmt_network | ansible.utils.ipaddr('network') }}"
        - "Broadcast: {{ mgmt_network | ansible.utils.ipaddr('broadcast') }}"
        - "First host:{{ mgmt_network | ansible.utils.ipaddr('1') }}"
        - "Last host: {{ mgmt_network | ansible.utils.ipaddr('-2') }}"
        - "Prefix:    {{ mgmt_network | ansible.utils.ipaddr('prefix') }}"
Output:
Network:    192.168.1.0
Broadcast:  192.168.1.255
First host: 192.168.1.1
Last host:  192.168.1.254
Prefix:     24
Tip
The ansible.utils.ipaddr filter is one of the most useful tools in network automation. Instead of hardcoding broadcast addresses, network addresses, and first/last usable IPs in variable files, I derive them dynamically from a single subnet definition. This reduces errors and makes templates work correctly across any subnet size without manual calculation.
Keeping Collections Updated
Check what’s installed vs what’s latest
ansible-galaxy collection listUpgrade all installed collections
ansible-galaxy collection install -r collections/requirements.yml --upgradeUpgrade a specific collection
ansible-galaxy collection install cisco.ios --upgradeWarning
Collection updates can introduce breaking changes. Cisco and Juniper occasionally deprecate module parameters or change module behavior between minor versions. Before upgrading collections in a production environment, I test the upgrade in Containerlab first. If collections/requirements.yml uses pinned versions (version: ==8.0.0), collections never update without my explicit approval.
ansible-lint and yamllint
These two tools are my first line of defense against broken playbooks. I run them before committing any YAML file.
YAML Syntax and Style Checker
yamllint checks for YAML syntax errors and style violations. It catches issues before Ansible even sees the file.
Lint a single file
yamllint playbooks/site.ymlLint the entire project
yamllint .Lint with a specific config
yamllint -c .yamllint playbooks/I create a .yamllint config file in the project root to configure the rules:
# ~/projects/ansible-network/.yamllint
---
extends: default

rules:
  line-length:
    max: 120
    level: warning
  truthy:
    allowed-values: ['true', 'false', 'yes', 'no']
    check-keys: false
  comments:
    min-spaces-from-content: 1
  comments-indentation: disable
max: 120- Allow longer lines than the 80-char defaultlevel: warning- Warn rather than error on long lines
ansible-lint Best Practice
ansible-lint goes further than yamllint because it understands Ansible-specific syntax and checks for:
- Using deprecated module names or parameters
- Tasks missing a
name:field - Using
commandorshellwhen a proper module exists - Hardcoded passwords in playbooks
- Incorrect YAML formatting for Ansible files
- Risky file permission settings
Lint a single playbook
ansible-lint playbooks/site.ymlLint the entire project
ansible-lintShow all available rules
ansible-lint --list-rulesSkip specific rules
ansible-lint --skip-list yaml[line-length]I create an .ansible-lint config file in the project root:
# ~/projects/ansible-network/.ansible-lint
---
profile: moderate

# Rules to skip
skip_list:
  - yaml[line-length]

# Warn but don't fail on these rules
warn_list:
  - experimental

# Exclude paths from linting
exclude_paths:
  - collections/
  - .git/
  - venvs/
profile: moderate- Bash, moderate, safety, shared, production
Ansible-Navigator
ansible-navigator is a newer tool that provides a text-based UI (TUI) for running and inspecting Ansible playbooks. It’s especially useful for reviewing the full output of a complex playbook run interactively.
Run a playbook with ansible-navigator
ansible-navigator run playbooks/site.ymlReview a previously saved playbook run
ansible-navigator replay playbook-artifact.jsonBrowse available collections interactively
ansible-navigator collectionsBrowse available modules
ansible-navigator doc cisco.ios.ios_configThe TUI lets me:
- Drill into individual task results
- See the full diff of what changed on each device
- Navigate through plays and tasks with arrow keys
- Search through output
For quick ad-hoc work, I still use ansible-playbook. For complex multi-device playbook runs where I want to inspect results interactively, ansible-navigator is better.
Info
ansible-navigator is the strategic direction from Red Hat because it’s the interface that Ansible Automation Platform (the enterprise product) uses. Learning it now means the skills transfer directly to AWX (the open-source version) and to any enterprise environment running Red Hat’s commercial offering.
Ansible is installed, configured, and verified. I understand the architecture. What the control node does, how it connects to devices via Paramiko over network_cli, and why the devices themselves need nothing installed.